![]()
![]()
Battery Management System
(Project finished in 2015)
Description
Communication protocol
Fast charging procedure
Central unit (prototype)
Host protocol
Setup utility program for PC
Downloads
As this program is useful for calibration and setup cell modules, here is more described how to use it. The program can be downloaded on the Download Page, where's explained how to connect the PC to the central module, or straight to cell modules.
Note: The program has been tested only under DOS (PCDOS, MSDOS and FreeDOS) and Windows XP.
When the program starts, it first reads all saved data from cell modules (Hi/Lo alarm, Bleeding set point and calibration constant), then it polls cell by cell for voltage and status (command "U"). Here's shown the program when the PC is connected to 48S battery (48 cells):
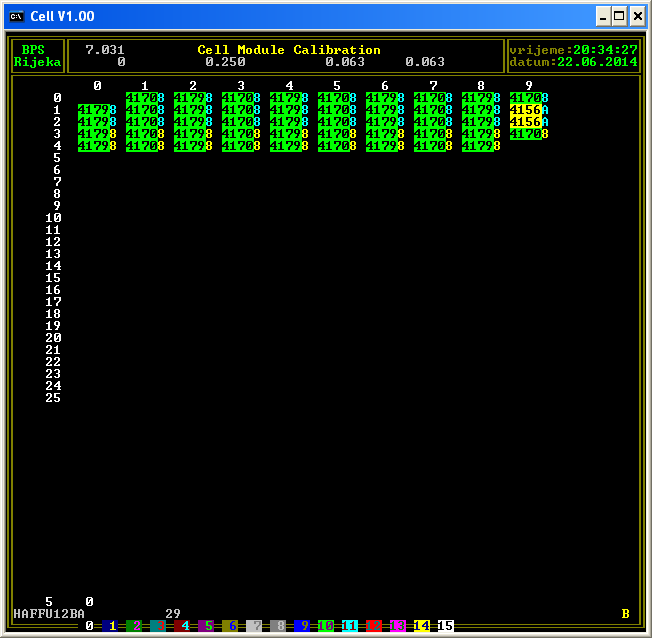
Note: The computer has been connected only to two LiPo cell battery,
other cells are simulated by copying data from these two cells. The purpose of
this simulation is to check the timing as well as to adjust the screen for max
cell modules in the chain (255). On bottom of this page has been shown picture
of the program window how it should look when it is connected to 250 cell
modules.
The status of each cell is shown with background
color as well as with the digit following the voltage; the battery has two cells
bleeding> #19 and #29, the status is shown with yellow color of the voltage and
"A" as status.
This program is mainly used for setup the initial parameters of the cell modules
(calibration constants, etc.).
The detailed view of particular cell module can
be displayed by using left/right arrow keys, left arrow key decreases the cell #
for view by one, when the cell # is zero, it means no cell selected; if the left
arrow is pressed when no cell selected (cell # is 0), then is selected the last
cell in the battery.
On the picture below is shown detail display of the first cell in the battery:

Below Cell No. are shown stored constants in
selected cell module in hex format (white) as well as are shown corresponding
volts (cyan).
The calibration constant is shown as voltage of the voltage reference pin as
well as the multiplier of voltage reference (expressed in mV) and max A/D scale
(1024).
While is cell number with blue background, it is possible to select other cell
using left/right arrow keys, up/down arrow keys are used for selecting the
parameter in the cell for change.
Pressing down arrow key once from cell selection,
selects the voltage of the cell as shown below:
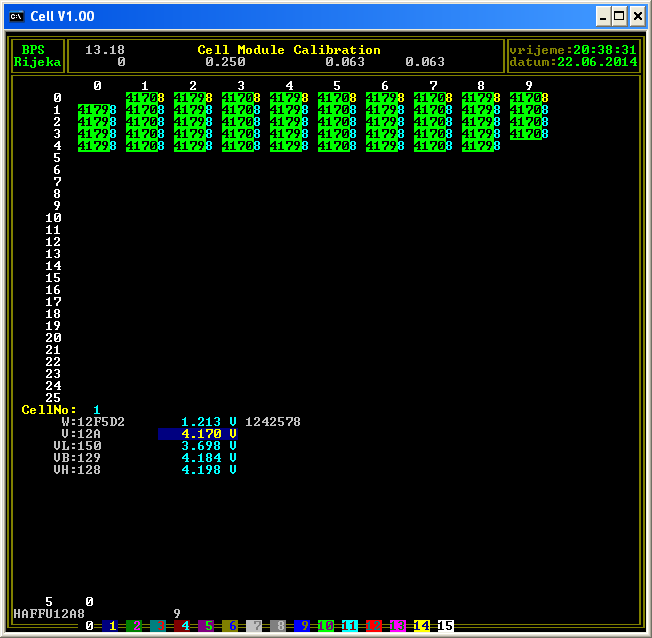
The W parameter is skipped as the calibration
constant is changed using U field (cell actual voltage( in such manner that the
voltage of the cell is measured with voltmeter and then the calibration constant
is changed indirectly, by setting the measured voltage into U field. This is
done by using left/right arrow key, where left key decreases and right key
increases shown voltage of the cell by 1mV. The actual calibration constant is
then calculated (as mentioned before, it is product of U field and actual
voltage, in picture above it is:
W = 0x12A * 4170 = 12421660
The result in the example above is little bit different as the calibration has
been done on different voltage. However, the difference is below the accuracy of
the cell module.
The confirmation of the changed value is done by pressing enter key.
Note: Without enter key, the constant is not changed in the cell module,
only in this program! In addition, here is no confirmation for successful data
write in cell module non volatile memory.
The bleeding voltage, as well as Hi/Lo voltage alarm levels are set on similar way, but every left arrow press increases the hex number on the left (white) by one and the the voltage has been calculated and displayed (using current calibration constant in the program). Thus the one press of left or right key changes these voltages for up to 14mV (higher voltage - higher delta).
This program is used mainly for testing as well as for calibrating and setting up the cell modules.
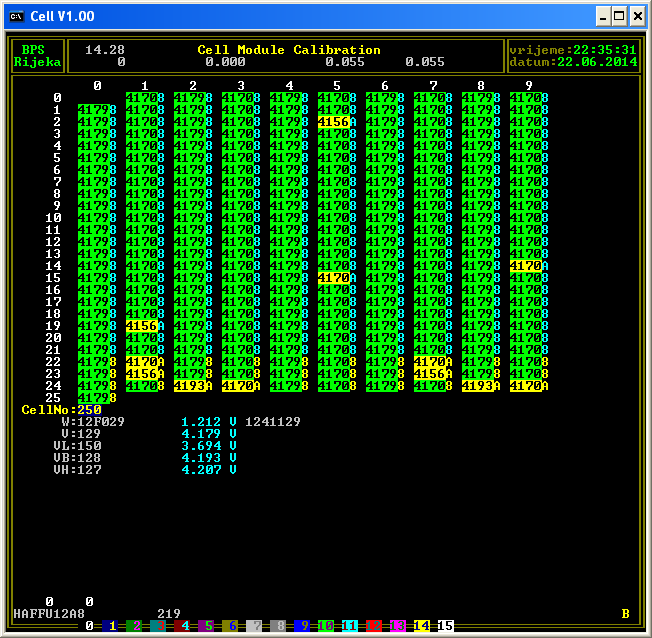
On the picture below is shown selection of the
250th cell in 250 cells system (again, it is simulated)
At the end, it is important to highlight that this program is not final product and thus is not documented (yet). However, the source code is available on the download page for those who want to see more inside the program. Unfortunately, the source code is not well commented, but it is not so complicated.
The program has been written for DOS platform as
I don't have any programming tools for making the programs on the Windows
platform (and I am not so interested for that). Simply, I used my old libraries
for projects done in period 1988-1994.
In addition, I am quite sure that this program can be easy run under Linux
platform using any DOS emulator for Linux...